


Why Is Oculus Quest 2 Blurry? Most Common Fixes
Why Is Oculus Quest 2 Blurry? Fast and Easy Fixes

Are you having trouble with your Oculus Quest 2 being blurry? If so, you're not alone. Many people have reported issues with the headset's image quality, causing it to appear blurry or pixelated. Fortunately, there are a few things you can do to fix this issue. In this article we'll cover some of the most common causes for an Oculus Quest 2 becoming blurry and how to fix them. From adjusting the lenses to ensuring that all of your cables are connected properly and more, these tips should help improve your VR experience in no time!
The Oculus Quest 2 is a great choice for VR users that want a high-quality VR experience without having to be stuck in front of their computer. The headset is lightweight, has an intuitive user interface, and its two built-in OLED displays offer a crisp, clear picture with low latency. The Quest 2 also boasts inside-out tracking technology that allows for free roaming in virtual reality.
Unfortunately, some users have reported that the image on their Oculus Quest 2 is blurry or pixelated. This can be caused by a variety of things. This can be a major bummer in your gaming session and can make it difficult to enjoy a smooth VR experience. Thankfully, there are some things you can do to fix the blurry image on your Oculus Quest 2.
In order to fix a blurry Oculus Quest 2, there are several steps that can be taken. Firstly, it is important to ensure that all cables are connected properly and securely. Secondly, users should ensure that the headset lenses are adjusted correctly to their individual eyesight. Thirdly, users can adjust the headset's IPD setting in the Oculus app to ensure the best possible image quality. Finally, users may need to adjust their display refresh rate within the Oculus mobile app or in their headset's settings. Each of these options can help to clear up any blurry images and provide a more enjoyable VR experience.
Meta Quest 2 Blurry? How to Fix
Adjust IPD to Decrease Blurry Image
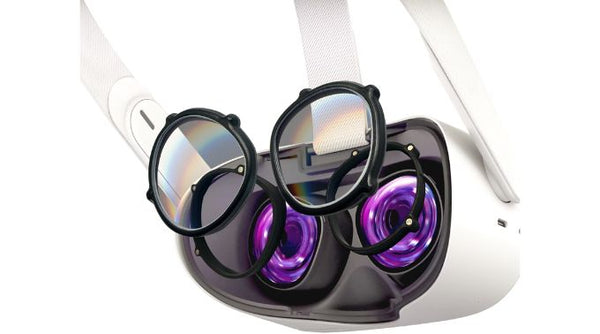
The Oculus Quest 2 has an Inter-Pupillary Distance (IPD) setting that allows the user to adjust the headset lenses for their particular eyesight. To adjust your IPD, open up your Oculus app on your mobile device and go to Settings > Device > Eye Comfort & Protection, then select Adjust IPD. From there you will be able to move a slider to adjust the lens spacing until the image appears as crisp and clear as possible. It is important to note that some users may experience discomfort when adjusting their IPDs, so if you experience any eye fatigue take breaks in between adjustments or try using lighter VR content such as media viewing instead of gaming.
Adjusting Quest 2 Headset
If your Oculus Quest 2 is still blurry after adjusting the lenses and IPD, you can also check that it is positioned correctly on your head. Make sure that the headset isn't too tight or loose and that it sits comfortably and securely on your face. If your headset has foam cushioning around the bridge of the nose, make sure this is adjusted correctly so you are not seeing double images.
Adjusting the headset to fit your head properly is an important part of getting a clear image from your Oculus Quest 2. To do this, start by loosening the straps and extending them until you can put on the headset comfortably. Next, tighten the top strap so that it fits snuggly around your forehead. Finally, adjust both sides of the headset until it sits comfortably and securely on your face without any gaps or spaces in between.
Quest 2 Lenses making image Blurry
The lenses on the Oculus Quest 2 are designed to help the user focus on virtual objects that appear close and far away. As we talked about the distance between each lens can be adjusted using an interpupillary distance (IPD) setting, which can be accessed in the Oculus mobile app. This allows users to align their eyes with the screen for a more comfortable viewing experience. The lenses also use different coatings and technologies such as aspheric designs and distortion-free glass optics, which are designed to reduce reflections, glare, blurriness, and other visual disruptions that can affect immersion in VR experiences. Additionally, most lenses contain anti-fogging technology that helps keep your view crystal clear when playing your favorite VR games. If your lenses are damaged or not functioning properly it can cause blurriness and other visual oddities.
Taking care of your VR Lenses
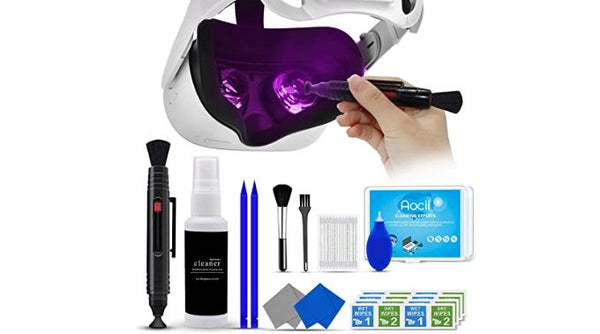
Taking care of your Oculus Quest 2 lenses is important for ensuring optimal image clarity living it up in virtual reality. The most important step is to keep the lenses clean and free from dust, dirt, and debris. To do this, use a microfiber cloth or lens cleaning cloth to gently wipe the surface of the lenses without applying too much pressure. Make sure you’re using a lint-free cloth that won’t leave any fibers behind on the lenses, we recommend a specialized VR cleaning kit like this to cover all your bases. Never use any type of cleaning solution on your lenses that are not designed specifically for your headset. These can damage their coatings and cause further blurriness. Additionally, it is also important to avoid touching the lenses directly with your fingers as oils and other particles can rub off onto them.
It is also recommended that users store their Oculus Quest 2 safely in a case or bag (this one is our top choice) when not in use, as this will help protect the lenses from scratches or damage caused by dirt or dust. Additionally, if you’re not using your Oculus headset, it is best practice to turn off both your VR headset and console so that no software updates are made while you are away from it which could affect image quality. Finally, make sure to regularly inspect your headset for any signs of wear or tear such as scratches on the lenses or fading of colors in order to maintain optimal performance when playing VR games.
If you get a scratch on your Oculus lense, it is important to address it as soon as possible to prevent the image quality from deteriorating. Unfortunately, scratches can't be easily repaired, so the best course of action is to replace the lense. To do this, you'll need to contact Oculus and arrange for a replacement lense. It is important to be proactive when it comes to keeping your lenses clean and in good condition, as this will help you get the most out of your Oculus Quest 2 experience!

Screen Resolution to Fix Blurriness
The screen resolution of your Oculus Quest 2 can also have an effect on image clarity. The default resolution for Quest 2 is 1440 x 1600 pixels per eye, which should provide a clear and smooth VR experience. Sometimes you may need to adjust your screen resolution in order to achieve the best image clarity. To do this, you'll need the help of a third party app: SideQuest. Once installed In the you can find the setting wrench icon in the top right of your screen. you can then scroll down and find your FFR (fixed foveated rendering) settings. You might need to experiment a bit with these settings to get the balance just right. Next go to the Default Texture Size section, and like with FFR, just try a few different options to see which one looks the best to you. The default settings will automatically adjust the resolution based on the type of content being used. The Low setting is better for those who need a lower latency experience with less detail. The Medium setting is perfect for most types of immersive VR experiences while still providing a good-quality image. The High setting is designed for those who want to get the most out of their VR experience by providing extra detail and clarity. If you are still experiencing a blurry image, give the High setting a shot and see if this clears things up.

Screen Brightness Quest 2
It is important to note that adjusting your screen resolution may result in a decrease in battery life due to increased power consumption. Additionally, some users may experience an increase in latency when using higher resolutions as well. However, these performance hits are generally not terrible; so if you are looking for an even more immersive VR experience then it might be worth bumping up your resolution settings!
The Oculus Quest 2 allows users to adjust the screen brightness in order to get the best image quality. To do this, open up the Settings menu on your headset and select Screen > Brightness. Here you can choose from several preset levels ranging from Low to High, or adjust the brightness level manually using a slider. It is important to note that if you are using your headset in bright conditions, you may need to increase the brightness level for maximum image clarity. On the other hand, if you are playing in a dimly lit area then it is recommended to decrease the brightness level in order to reduce eyestrain and improve battery life.
When adjusting the brightness level of your Oculus Quest 2 it is important to remember that certain colors may appear darker or lighter depending on your settings. For example, increasing the brightness will make light colors appear brighter and dark colors will become more saturated. Make sure to adjust your screen brightness until you achieve a good balance between visibility and comfort while still maintaining optimal image quality. Additionally, it is also worth noting that too much screen brightness can cause eye strain over long play sessions, so be sure not to go overboard with your settings.
Eye Relief Distance
The eye relief distance, also known as the fixed focal distance, is the optimal distance that a user needs to keep between his or her eyes and the lenses of the headset in order to achieve the best possible image clarity. The ideal distance should be around 1/2 inch or 1.27cm in order to ensure that each pixel is fully illuminated and all details are visible. This is important because when your eyes are too far or too close to the lenses, some of the details may not come into focus or be distorted. Additionally, if you move too far away or too close to the lenses, you may experience eyestrain due to inaccurate focusing.
Since this is a fixed variable there isn't a lot you can do to adjust your focal distance, but it is helpful to note that staring at objects that are super close to you in VR can cause increased eyestrain because the current VR displays may have a hard time processing those images as clearly as you'd like them to be. So, when in doubt, just take a step back to view objects that are within a few inches of you in VR!
Processing Power Causing Blurriness
Another common issue that can impact the clarity of your Oculus Quest 2 headset is limited processing power. If you are using a particularly demanding application, such as a virtual reality game, it may be difficult for the headset to render all of the images at once. This can cause image quality issues such as blurring or pixelation which can negatively affect your immersive experience. I know this sounds counterintuitive but to remedy this specific problem, try reducing the display resolution and settings in order to lower the strain on your hardware while still maintaining a good visual experience. It can be a balancing act trying to match the right amount of display resolution with smooth gameplay and low lag. If you find this to be too much of a problem it may be time to consider upgrading your hardware which can help boost performance and reduce latency during extended use sessions.
Screen-Door Effect
The screen-door effect (also known as the SDE) is more common in low-end VR headsets and older models that had low-resolution displays, where the fine details of a scene appear to be separated by a grid of black lines. This phenomenon occurs when the pixels on a display are too large and not dense enough to create the nice smooth image you're hoping for. SDE can still happen on modern headsets so, if you look super closely at your Oculus Quest 2, you can see individual pixels in the display and you might even be able to make out the black spaces between them.
In order to avoid this issue, it is important to choose a device with a high enough resolution. While it's difficult to avoid this with older models, setting your headset up with the best graphics and settings will help to overcome the worst of SDE problems. On your Oculus Quest 2, this means selecting the highest settings in order to get maximum clarity and detail. Additionally, reducing the distance between each lens can also help minimize the noticeability of this issue by allowing more light onto each pixel and increasing focus. This can be done using an interpupillary distance (IPD) setting available through the Oculus mobile app that we talked about earlier.
Damage To Your Quest 2
If you're anything like us your Quest 2 has taken a few bad slips and bumps. You should be aware that if your Quest 2 headset has been damaged in any way, it can definitely lead to reduced image clarity. This could include a cracked lens or display component which can cause distortion and blurriness. If this is the case, it may be necessary to replace your hardware entirely in order to enjoy clear VR experiences again.
It's important to take care of all of your Quest 2 components in order to ensure they last as long as possible and provide the best viewing experience possible. Damaged headsets are not only uncomfortable to use, but they can also create safety issues such as nausea or dizziness due to increased eyestrain during extended periods of use, so best get that fixed up asap.
Prescription Eye-Glasses and VR
A lot of people don't realize it but VR headsets are setup for people with close to 20/20 vision. So if you wear glasses normally, but are taking them off when you put your headset on, your eyesight is likely impacting the clarity of your VR experience. The lenses inside a VR headset won't be able to correct for any vision issues that you have as accurately as a pair of custom prescription glasses or contacts can. Additionally, wearing an uncorrected pair of lenses can result in eye strain and fatigue due to the inability of your eyes to properly focus on the pixels within the display.
People who wear glasses in VR have several options available to enhance their experience. For one, they can opt for VR-ready prescription lenses, which are specifically designed to fit inside a headset and provide the correct amount of magnification for individual users. Additionally, there are specialty glasses-friendly VR inserts that create a bit of space between your spectacles and your headset, these allow people with corrective lenses to enjoy VR without having to switch out their glasses every time.
For those looking for a more permanent solution, companies such as VR Wave offer custom prescription inserts that sit between the headset’s lenses and the user’s eyes. This allows those with vision impairments or corrective needs to enjoy an optimal visual experience without needing additional eyewear or add-ons.
Ultimately, whatever option you choose, it is important that your virtual reality headsets provide ample space between your eyes and its internal display components so that it can accurately accommodate your vision needs while providing comfortable viewing experiences during extended use periods.
Connecting Quest 2 to PC
Finally, keep in mind that if you plan on using PCVR games or applications through your Oculus Quest 2 headset, the quality of your visuals may be affected. This is because the hardware specs of your Quest 2 device can’t quite match up to a dedicated gaming PC or console. However, there are ways to reduce lag and increase image clarity when playing PCVR titles on your Quest 2. With some optimization settings such as lowering resolution and anti-aliasing, it is possible to find a balance between smooth playability and decent visuals - but this will come at a cost in terms of performance. Ultimately this is something you will have to experiment with in order to discover what works best for you and your setup. You may have to be content with sacrificing a little bit of visual clarity for the ability to play your favorite PCVR games
Time to upgrade your VR Headset?
The Oculus Quest 2 is a great option for those looking to experience virtual reality without having to invest in expensive PCVR headsets. Its main advantage is its convenience and portability, allowing users to easily move it around and set it up depending on their needs. Additionally, the device itself offers an all-in-one solution for gaming without the added hassle of connecting to an outside console or PC.
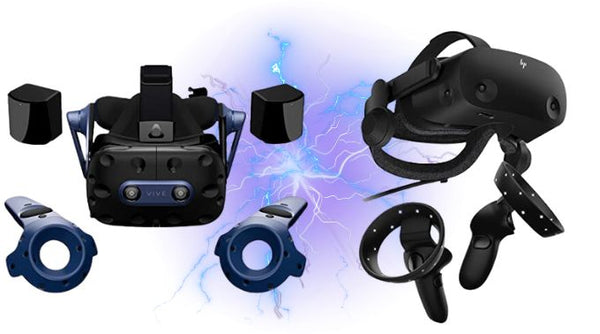
However, when it comes to sheer visual fidelity and performance, dedicated PCVR headsets still offer an edge over the Quest 2 due to their higher-end hardware capabilities. For example, many PCVR headsets have access to more powerful processors that can handle more demanding applications such as games at higher resolutions and frame rates. This can result in smoother gameplay and more immersive visuals than what the Quest 2 can currently provide. Furthermore, PCVR headsets often come with better integrated audio components which can help bring your VR experience to life. So if you really just aren't happy with the quality of your current headset, it might be time to consider upgrading to something like the HTC Vive Pro 2 or HP Reverb 2.
In conclusion, while the Oculus Quest 2 is a great option for newcomers to VR or those who want an affordable device for casual gaming sessions, those looking for top-tier visuals and performance should consider investing in a dedicated PCVR headset instead.